Este conteúdo foi ampliado e vive aqui: How to Draw a Dragon — Easy Step by Step for Kids (Free Printable PDF)
This is the short version of How to Draw a Star — Easy Step by Step for Kids (Free Printable PDF): what to print, how long it takes, and how to tell whether it worked.
Type your child’s name and print a custom tracing worksheet in seconds — free, no sign-up.
Make my worksheet →
If the first attempt goes badly, drop one level instead of repeating the same sheet; frustration erases progress faster than difficulty builds it.
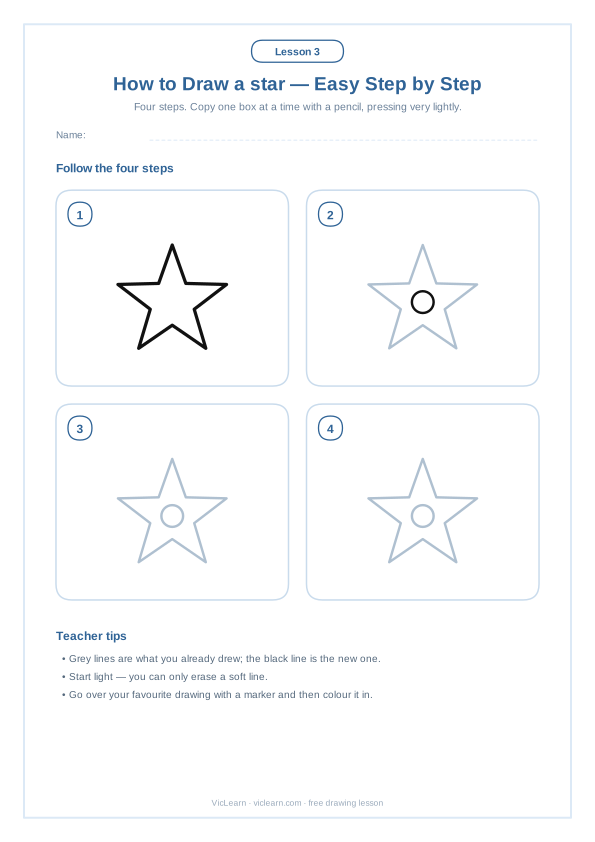
This is lesson 3 of the VicLearn free drawing course. In about ten minutes a child learns to draw a star on their own, using only shapes they already know: circles, ovals, triangles and straight lines. The printable is a two-page A4 PDF — four numbered steps on the first page and a practice page with a dotted model to trace and two boxes to draw in.
What you need
- A printed copy of the PDF (A4 or US Letter, “fit to page”).
- One pencil — an HB is perfect — and an eraser.
- A black marker and coloured pencils for the final drawing.
The four steps explained
Each box on the printable adds one new part. The grey lines are what the child has already drawn; the black line is the new one.
- Make a light dot in the centre and one at the very top.
- Draw two lines down to the left and right points.
- Close the bottom two points with two more lines.
- Go over the outline and add a small circle in the middle.
Common mistakes and how to fix them
- Pressing too hard. Ask for a “whisper line” in step 1 and 2; strong lines only in step 4, once the shape is right.
- Starting too small. The first shape should fill about half the box, otherwise the details will not fit.
- Copying the finished picture instead of the steps. Cover the later boxes with a sheet of paper so only the current step shows.
How to adapt it by age
- Ages 4–5: Do steps 1 and 2 together, hand over hand, and let the child finish the details. Trace page is enough.
- Ages 6–7: Child follows all four steps alone; the adult only checks the size of the first shape.
- Ages 8–10: After the four steps, ask for a background and a second version from memory, without looking.
Take it further
- Draw the star three times, each one bigger than the last.
- Make a scene: put the star in a place and add three things around it.
- Turn the best drawing into a card — fold an A4 in half and copy it on the front.
- Colour it with only two colours to practise contrast.
Questions parents and teachers ask
Is this drawing course really free?
Yes. Every lesson is a free printable PDF made by VicLearn. There is no sign-up, no email required and no watermark.
What age is it for?
It works from 4 to 10 years old. Younger children trace the dotted model; older children draw from the steps and add a background.
Can I use this star lesson in my classroom?
Yes. Print one copy and photocopy it for the whole class. The file is vector, so the lines stay sharp. Please do not resell the file.
Do I need special paper or pens?
No. Ordinary printer paper and a pencil are enough; a marker and coloured pencils only make the final drawing nicer.
Continue the course
- Previous lesson: How to Draw a Flower — Easy Step by Step for Kids (Free Printable PDF)
- Next lesson: How to Draw a House — Easy Step by Step for Kids (Free Printable PDF)
- See all 12 lessons
This lesson is part of a 12-lesson course that goes from simple shapes to animals and vehicles.
Download PDF (A4)
Download PNG
Print now
Free for classroom and home use. Please do not resell the file.
- How to Draw a Flower — Easy Step by Step for Kids (Free Printable PDF)
- How to Draw a Fish — Easy Step by Step for Kids (Free Printable PDF)
- How to Draw a Unicorn — Easy Step by Step for Kids (Free Printable PDF)
- How to Draw a Dragon — Easy Step by Step for Kids (Free Printable PDF)
- How to Draw a Dinosaur — Easy Step by Step for Kids (Free Printable PDF)
Everything on this page is drawn as vector line work, so it prints sharp at any size. Here is exactly what this games activity trains and how to get the most out of one printed copy.
What your child actually practices here
- Motivation: a game finishes with a win, not with a corrected page.
- Turn-taking and rules: playing with someone else adds the social layer worksheets never have.
- Working memory: remembering where a card was is a direct exercise for the memory used in reading.
- Vocabulary: every card is named out loud, several times, in a natural way.
Best age range and how to adapt it
- 3 to 4 years: expect an adult to work alongside the child and to finish only part of the page — that is a complete session at this age.
- 5 to 6 years: the child should manage the sheet alone in about ten minutes and want to show the result.
- 7 years and up: use it as a warm-up before harder work, or ask for a personal variation (new colors, an invented title, a second page).
What you need
- A4 or US Letter paper (plain 75g is enough — the file is vector, so it stays sharp)
- A pencil, or thick crayons for children under five
- Optional: a plastic sleeve or laminating pouch plus a dry-erase marker to reuse the sheet
A 15-minute plan you can follow today
- Set up: table cleared, one pencil, no screen in the line of sight.
- Work: one single sheet. Two pages in a row is the fastest way to turn a good activity into a chore.
- Close: ask the child to explain what they did — the explaining is where the learning is consolidated.
Five ways to reuse the same sheet
- Name each card out loud in a second language.
- Use the cards as flashcards outside the game.
- Let the child be the one who explains the rules to someone else.
- Play with fewer cards for younger children, more for older ones.
- Play cooperatively: everybody against the clock instead of against each other.
Common mistakes (and the quick fix)
- Printing at reduced scale: always choose “fit to page” or “actual size”; shrinking the sheet makes the lines too tight for small hands.
- Correcting every stroke: pick one point of feedback per session and let the rest go.
- Doing several sheets in a row: the second page is almost always worse than the first.
Frequently asked questions
Is this how to draw a star printable really free?
Yes. The PDF downloads directly, with no sign-up, no email and no watermark. You can use it at home and in the classroom.
Can I print it for my whole class?
Yes. Print one copy and photocopy it, or print as many as you need. The only restriction is reselling the file itself.
What paper size should I use?
The file is built for A4 and prints perfectly on US Letter as well — just keep the printer on “fit to page”.
Will it print well in black and white?
Yes. Everything is vector line work, so a plain black-and-white laser or inkjet printer gives a clean result.
Can I reuse the same sheet?
Put it inside a plastic sleeve or laminate it and use a dry-erase marker. One print then lasts for months.
Keep a folder with the finished sheets. Progress in handwriting and attention is only visible when you compare two weeks apart.
Explore the topic
More in this topic
Get the complete pack of this set — free
One email, one link, all the sheets of this topic in a single PDF. No spam, unsubscribe in one click.
What you need to print this well
- Bright white printer paper (24 lb)Markers stop bleeding through at 24 lb / 90 g.
- Dry-erase pocketsTurn one printed sheet into unlimited practice.
- Triangular beginner pencilsFixes the grip before the handwriting habit sets.
- Laminator + pouchesFor the charts and cards you will reuse all year.
Links to Amazon. If you buy through them we earn a small commission at no extra cost — it keeps every sheet on this site free.
Want the printer-ready mega packs? See the printable packs.